The itinerary screen is where you can make a collection of reservations for your customers. You can easily see customer details, booking and payment details all from one screen.
TABLE OF CONTENTS
- Overview of the itinerary screen
- Create a new itinerary
- Availability screen overview
- Adding a reservation to an existing itinerary
- Add a charter product to an itinerary
- Add a package to an itinerary
- Booking other suppliers
- Confirm an itinerary with a credit card
- Paying for an itinerary
- Search for an itinerary
- Edit a reservation on an itinerary
- Reschedule a reservation on an itinerary
- Cancel a reservation on an itinerary
- Edit, reschedule or cancel packages on an itinerary
- Apply a promotion to a reservation on an itinerary
- Send confirmation or proforma invoice emails from the itinerary screen
- Managing customers on an itinerary
- Generating an itinerary for a reservation that does not have one
- Move a booking to a new itinerary
- Add day notes to communicate information to your frontline team
Overview of the itinerary screen
The itinerary screen has three panels:
Search Panel (Left)
- Displays itineraries for your business unit on the selected date, sorted by departure time.
- Search by customer name or departure times
- Filter search by Active, Cancelled, or all itineraries.
- Show day notes
- Show/hide booking name or marketing data on the reservation detail panel.
- Right-click function on the refresh button reveals additional view options and behaviours.

Summary Panel (Centre)
- Shows details of the selected itinerary, including customers, bookings, items, and payments.
- The itinerary ID (unique reference) is displayed at the top.
- The note field at the bottom is for internal communication and auto-saves as you type.
Detail Panel (Right)
- This panel dynamically displays information based on your selection in the Summary panel:
- Click the customer name to view and manage customer details.
- Click a reservation to view and manage booking details.
- Click a settlement transaction to view receipt details.
- Includes a searchable Booking ID field.
- Function buttons for managing booking-specific promotions and communication.
- This panel dynamically displays information based on your selection in the Summary panel:

Create a new itinerary
There are several ways you can start creating a new itinerary in IBIS.
1. Create a new itinerary from the Itinerary screen
- Open the Itinerary screen, then click New.
- Enter the customer's name and email, then click Add or select an existing customer.
- When prompted, click Yes to create the itinerary.
2. Create a new itinerary from the Customers screen
- Open the Customers screen, and add or search for the customer.
- Select the customer and click New itinerary at the bottom of the screen.
- Confirm by clicking Yes when the Itinerary screen opens.
3. Create a new itinerary from the Hire or Appointments screen
- Open the Hire or Appointment screen and select your booking date.
- Choose the product from the bottom-left menu to view available time slots on the right.
- Right-click on a time slot, select the product and add the customer’s name and email.
- The booking will open in the Itinerary screen, where you can finalise details.
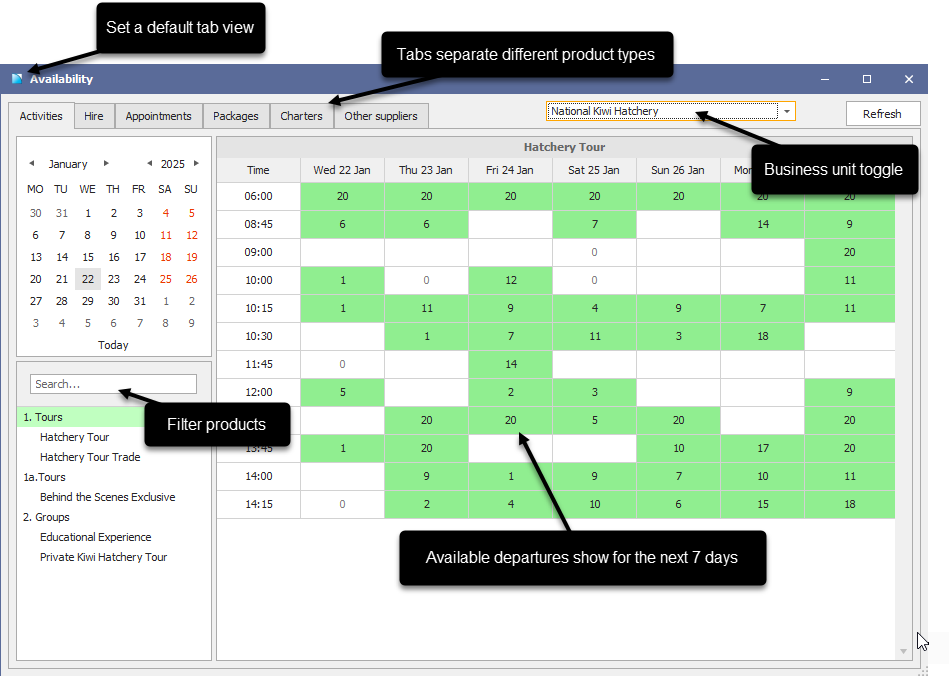
4. Create a new itinerary from the Availability screen
This option is useful if you want to check available spaces before you start creating a new itinerary. (Not currently available for package type products).
- Open the Availability screen and select a product type tab.
- Choose a departure date on the calendar.
- Select the product from the bottom-left list. Available spaces will appear on the right.
- Click on a departure time, confirm a new itinerary by selecting Yes, and enter the customer’s name and email.
- The booking will open in the Itinerary screen, where you can finish adding details.
Availability screen overview
The availability screen shows all reservation product types that can be added to an itinerary.
Adding a reservation to an existing itinerary
- With your itinerary open, click the Availability button.
- Choose the appropriate product type tab and select a departure date in the Availability screen.
- Pick the product from the list on the bottom left. Available times for the week will appear on the right.
- Click on the desired departure time. When prompted, select Yes to add the booking to the itinerary.
- Fill in the following on the right-hand side of the itinerary panel:
- Booking agent and voucher reference (search agents by typing their name in the Account field; use delete/backspace to clear).
- Extra info (e.g., how you heard about us).
- Units required for each price option.
- Pickup/drop-off details, if needed.
- Operational notes for manifests.
- Click save to complete, and the unique Booking ID is generated. Depending on your settings, you may be prompted to capture customer origin or be prompted to enter your user PIN code.
- Repeat these steps to add additional bookings to the same itinerary.

Add a charter product to an itinerary
Charter products can be booked from the Charters tab on the Availability screen. To book a charter:
- Open the Availability screen and select the Charters tab, then choose your departure date on the calendar. All existing scheduled charter services will appear at the bottom of the screen.
- Select the charter product you would like to book by clicking Add.
- Confirm the date, time and places for the charter in the popup, then click Create charter service.
- Once created, your charter will appear in the Scheduled charters list at the bottom of the screen. Click the number under Avail Places to start a new booking in the Itinerary screen.
Edit functions have not been implemented yet. To modify the time of an existing charter departure, you need to add a new charter service and reschedule your booking to the new time. Charter services can be made inactive in the Specific Availability screen.
Add a package to an itinerary
A package is a type of combo product that contains two or more activities, appointments or hire products. Packages can also contain retail, gift vouchers, etc. When you book a package, it automatically creates a reservation for all the products contained within the package.
To book a package:
- Start a new itinerary, then click Availability.
- Open the Packages tab on the Availability screen, then select the date.
- Choose your package from the list on the bottom left, and the available spaces and times appear on the right.
- Choose your departure date/time, when prompted, say yes to add the package to the itinerary.
- When the Itinerary screen opens, the package header displays on the detail panel.
- Depending on what products are contained in the package, you will be prompted to enter units and/or select departure times for some of the products within the package If you have a choice of options.
- For reservation bookings, select the price options available
- For hire bookings, you will see the resource that the booking has been made in
- For appointment bookings, you will see the resource & therapist for that booking
- Once you have selected all the units/times for your package, click Update/Create package.
Repeat the steps above to add more products to your itinerary.

Booking other suppliers
These are products booked with external operators, like hotels, and are set up in the Ticketing screen for booking agents. Currently, it is recommended to sell Other Supplier products only for itineraries where full payment will be collected.
- Choose the product from the Other Supplier tab in the Availability screen, then click New Booking.
- Enter the details to complete the booking in the Itinerary screen.
- Enter units
- Set the date/time
- Enter a pickup and pickup time if required
- Capture Extra info (optional marketing data)
- Book the product directly with the operator and add their booking reference in the Voucher field.
- Take the balance To POS to capture payment from the customer as usual.
Confirm an itinerary with a credit card
If you operate a weather-dependent business, it's not always practical to charge the guests at the time of booking. You can securely store the customer's credit card details as follows:
- Click the customer name in the centre panel.
- At the bottom of the detail panel, select Store CC
- In the stored card popup, click Add card, and follow the prompts.

Paying for an itinerary
Pay directly through Point of sale for all reservations in the itinerary
When your customers are ready to pay, you can select To POS from the Itinerary panel (centre) to take all reservations to Point of sale for payment. Follow this process when the sale type for a reservation in the itinerary is Direct.
If you have a stored credit card on file for the customer, you can charge this card at POS. Click the Stored CC link at the bottom of the customer panel in the POS screen.
Pay for an individual booking within the itinerary
If the customer is only paying for an individual booking, you can select To POS from the detail panel on the right-hand side. Ensure you have selected the correct booking to take payment for.
Partially pay for an individual booking at POS
If the customer is only paying for a portion of the reservation, i.e. an individual in a group booking for example, then you can adjust the sale price of the reservation at POS one of two ways:
Post to invoice for agent all sale type
If the booking is made on behalf of an agent that you will invoice, click Functions on the right-hand detail panel, then select Post to invoice. In the popup, adjust the commission rate and invoice descriptions if required.
Post commission for a referral agent
If the booking was made on behalf of a referral agent, click To POS on the booking detail panel. This will prompt the user to post the default agent commission before the booking opens in the Point of sale screen. If the user says no, no commission is posted.
Pay the balance of the sale for a deposit sale type
If the booking was made for an agent with a deposit sale type, click To POS on the booking detail panel. You are prompted to post the deposit paid (i.e. the commission) to the agent account before proceeding to Point of sale with the balance.
Search for an itinerary
You can only search for an itinerary in the left-hand panel. If you know the Itinerary ID, you can enter it in the Itinerary ID field, then click ENTER to search. If you know the booking reference, enter it in the Booking ID field on the right-hand panel.
The Search tab on the Departures screen displays all bookings in your system. You can filter results by date, operator, product or agent. Use the Find field to filter results for customer names, voucher numbers or anything else.
To open a booking once you've found it, click the booking ID or double-click anywhere in the row to open the booking in the Itinerary screen.
Want the Itinerary screen to open by default when managing your reservations? Ask us to make this your default reservation screen.
Edit a reservation on an itinerary
If you need to modify reservation details, follow these steps to edit your reservation:
- Open the reservation in the Itinerary screen details panel.
- Click Edit from the bottom right-hand menu.
- The reservation will change to edit mode, make any changes as needed then click Save.
- All edits are saved in the Booking history which can be viewed under the Functions menu on the right.
Changes must be saved at the time of editing. If you navigate away from the reservation when in edit mode, your changes will be lost. There is no warning.
Reschedule a reservation on an itinerary
If you need to change the date and time of a reservation:
- Open the reservation in the Itinerary screen details panel.
- Click the drop list on the Edit button from the bottom right-hand menu, then select Reschedule.
- The screen will turn yellow to indicate it's in reschedule mode and the Availability screen will open.
- Select the new date, departure time and/or product, then amend any details if needed.
- Click Save to confirm your changes.
- All edits are saved in the Booking history, which can be viewed under the Functions menu on the right.
Customers rescheduling appointments on the same day can still use the drag and drop functions on the Appointment screen. See related articles for how to edit appointment reservations for details.
Cancel a reservation on an itinerary
If you need to cancel a reservation, follow these steps:
- Open the reservation in the Itinerary screen details panel.
- From the status droplist, select Cancelled.
- Select the cancellation reason, the booking will save automatically.
- If you chose the wrong reason, change the status back to Active and Save, then redo the steps.
- Take any refund owing to POS (direct accounts only). If it's an agent booking, select clear posting under the Functions menu if it was already posted to invoice.
- All edits are saved in the Booking history, which can be viewed under the Functions menu on the right.

Partial cancellations
If you wish to apply a cancellation fee to only some customers on a reservation, you will need to split them out on to a new reservation to manage it. At this time, we do not have an automatic split reservation function on the itinerary screen menu, so to manage this process, add another reservation to the itinerary and move the customers here that you will be splitting off, save then cancel it, ensuring you apply the correct cancellation fees.
Edit, reschedule or cancel packages on an itinerary
If you need to make changes to a package, you can use the bulk edit functions found on the package header.
- Select the package header on the itinerary panel to view the details on the right-hand pane.
- If you need to make changes to the units, update the Adult/Child options as necessary.
- To make changes to dates/times, click reschedule and follow the prompts to update all reservations in the package.
- If you want to cancel all bookings in the package, click cancel package, then select the reason.
- Once you have finished editing the package, click Update/Create package to save your changes.

Apply a promotion to a reservation on an itinerary
You can apply a promotion to a reservation after it has been saved in the itinerary.
- Ensure the reservation you wish to apply the promotion on has been saved.
- Click the functions button at the bottom of the right-hand panel, then select Apply promotion.
- Select the promotion from the list available.
- Once selected it will add to the booking automatically.
- To remove the promotion, click the functions button, then select Remove promotion.

Send confirmation or proforma invoice emails from the itinerary screen
The itinerary screen allows users to send the following types of emails:
- Itinerary confirmation emails
- Itinerary proforma invoice email (attach an invoice as a PDF with a PF-{Itinerary number} reference
- Booking confirmation email (uses the same template as itinerary email, but only sends for the selected booking)
- Proforma booking email confirmation (uses the proforma booking template email - no PDF attachment)
You can use the Send email function from the itinerary panel (centre) to email a confirmation or proforma for all bookings contained in the itinerary (proforma will only send for reservations contained within your business unit) to the primary customer on the Itinerary. Alternatively, you can also send a confirmation email to ALL customers on the itinerary.
The reservation detail panel also has a send email option under the Function button for sending a confirmation or proforma invoice for the specific booking.
Emails sent from the itinerary screen are recorded in the booking history for each reservation. If your itinerary contains cancelled reservations, these are excluded from any email communication.
Thank-you emails, and SMS text functions must be accessed from the legacy Booking screen (bulk send SMS can still be sent from Departures screen).
Managing customers on an itinerary
When an itinerary is generated you must select a primary customer to generate the itinerary for. You can add and remove additional people on the itinerary to send communication to all members of a group as follows:
Add people to an itinerary
- At the bottom of the centre panel of the itinerary screen, click Add person,
- Enter the details of the customers you wish to add in the popup.

If you wish to remove a customer that has been previously added to an itinerary, right-click on their name and select 'Remove customer'.
You cannot change the primary customer after the itinerary is generated. In that situation, you must generate a new itinerary and move bookings and customers to the new itinerary.

Generating an itinerary for a reservation that does not have one
If a booking has been created without an itinerary for some reason (e.g. a booking is made via API or the Series booking screen), you can easily create an itinerary for it.
- Find the reservations without an itinerary in the itinerary search panel. They will appear with the reservation ID at the start and slightly greyed out.
- Click the booking and it will prompt you to create a new itinerary or add to the existing itinerary you have open.
You must have an existing itinerary open before you can use this function. If you try and generate an itinerary without having an existing itinerary open first (e.g. when you first open the screen), it will not work.

Move a booking to a new itinerary
If you accidentally create a new itinerary instead of adding a booking to an existing one, you can move your booking to a new itinerary.
- Note down the booking ID of the reservation you want to move to your existing itinerary.
- Open the itinerary you want to move it to. If an itinerary does not already exist, click New at the top of the Itinerary panel to add one, then enter the customer details.

- Under the Functions menu in the centre panel of the new itinerary, select move booking to itinerary.

- Enter the booking ID when prompted, and you will have successfully moved the booking.
- Once the booking is moved, you can disassociate the wrong customer from the previous itinerary by right-clicking on their name and selecting 'remove'.
Add day notes to communicate information to your frontline team
Day notes can be added to show on a specific date on the Itinerary screen by clicking the Note button. You can double-click an existing day note to edit. While day notes cannot be deleted, you can overwrite them with new content or resave them as blank to effectively remove the message.

If you don't want to use the day note function, you can hide it by right-clicking the Refresh button on the Itinerary search panel and unticking Show day notes.