The Point of sale screen in IBIS can be heavily customised to suit your business requirements, including optimising for touchscreens or keyboards. IBIS POS gives you the flexibility to create whichever buttons will help you perform more efficiently. It makes sense to create buttons for the things you use frequently, such as commonly sold retail items and everyday Point of sale functions.
TABLE OF CONTENTS
- Point of sale layout
- Adjust POS grid height
- Working in design mode
- Create buttons
- POS system function buttons
- Change the button sizes & colours
- Button caption-text formatting
- Restrict buttons and functions with a password
- Button properties - using modifiers to save time
- Add submenus to group your items
- Edit POS buttons
- Move buttons around
- Remove buttons
- Set up keyboard shortcuts
- Configure unique POS menus per location
- POS buttons recommended for touchscreen use
Point of sale layout
You can manage your Point of sale screen layout under the System settings menu (located under System). You can adjust the number of button rows and columns as desired and save your changes. After saving, you will need to close/reopen the Point of sale screen to see your changes.

Adjust POS grid height
You can configure the sales grid height - this is useful if you do not sell retail or do not require any Point of Sale buttons, or if you frequently sell many retail items in one sale.

Working in design mode
Adding and editing buttons in the POS menu can only be done when you are in design mode. When you are in design mode, you cannot perform any other standard Point of Sale functions until you exit design mode. Follow these steps to enter and exit design mode:
- Right-click on a button and select Enter design mode.
- When prompted, enter the POS screen layout password. Note: If you do not know the Design Mode password, open System Settings | Point of sale layout. The Edit POS layout password is then displayed.
- When you are finished editing, right-click any button and select Exit design mode.
`
Create buttons
You have the flexibility to create whichever buttons will help you perform more efficiently when using Point of sale. It makes sense to create buttons for the things you use frequently, such as commonly sold retail items and everyday functions. There are 5 types of buttons you can create:
- Items - used to add a specific retail item to the POS grid.
- Discounts - allows you to select from a list of discounts you have set up in the Discount screen.
- Payments - allows you to select from a list of payment types set up in the Payment types screen.
- Submenus - opens a new button menu underneath when clicked, useful for grouping buttons.
- System functions - perform specific functions as described in the next section.
To create a new POS button, follow these steps:
- In design mode, right-click an empty button and select Edit button.
- Choose your button type by ticking the box to enable the selection field.
- Select the item, discount, payment, or system function from the droplist (note items, discounts and payment types must be set up first).
- Once selected, the button caption will fill out automatically. Adjust the caption if required, avoiding control characters such as &, or % if possible.
- Select any other properties as required, then press OK.

POS system function buttons
The following functions can be added to your Point of sale menu (many already are shown by default).
| Function | Description |
|---|---|
| Account credit | Applies a credit to an account. Used for paying an invoice by credit card. |
| Apply promotion | Prompts users to enter a promo code or promo voucher code at POS. |
| Clear discounts | Removes discounts applied to items. |
| Complete sale | Completes a $0 value settlement transaction. E.g. when a gift voucher is redeemed. |
| Customer file | Launches the Customer screen. |
| Customer lookup | Launches the Customer screen. |
| Customers | Launches the Customer screen. |
| Decrease units | Reduces the units in the sale. Can be added for touchscreen use. |
| Delete line | Removes the highlighted line from the POS screen. For touchscreen use. |
| Eftpos cutover | Runs the EFTPOS cutover report for integrated EFTPOS users. |
| Eftpos debug | Troubleshooting mode for some EFTPOS integrations. |
| Eftpos enquiry | Runs an EFTPOS enquiry function |
| Eftpos logon | Logs in to the EFTPOS system |
| Eftpos reprint | Reprints the EFTPOS receipt |
| Eftpos acquirer select | Integrated EFTPOS function |
| Eftpos terminal select | Integrated EFTPOS function |
| Eftpos upload offline Txns | Tries to update the last EFTPOS transaction |
| Email/print receipt | Launches the receipt emailer screen. You can print to an A4 printer if needed. |
| Find held sale | Opens the Find sale screen and defaults to the held sale tab. |
| Find transaction | Opens the Find sale screen. |
| Foreign cash | Calculates foreign exchange rates on cash (must have payment types set up) |
| Hold sale | Prompts users to hold a sale. |
| Increase units | Increases the units in the sale. Used on touchscreens. |
| Item lookup | Find items to sell through POS. |
| Line discount | Applies a discount to the selected item. |
| Load transaction | Opens a specific transaction |
| No sale | Opens the cash drawer and prompts for a reason. |
| Note | Adds a POS note to the transaction. |
| Open gate | If you have an integrated gate, you can send an open command from POS. |
| Pair eftpos terminal | Eftpos set up function for Smartpay. |
| Payment exchange mode | Rebalance payment types used at POS |
| Person credit | Used to top up or settle the balance of a customer account. |
| Person identifier | Specify a unique RFID identity for a customer. |
| Print kitchen dockets | Reprints an order docket for menu/cafe items |
| Print sale summary | Prints a thermal report summarising daily sales |
| Redeem admission tickets | Validates admission tickets when scanned at POS |
| Redeem gift voucher | Prompts for a gift voucher ID to redeem against a transaction. |
| Reprint receipt | Reprint a POS receipt |
| Return mode | Prompts the user to refund items at POS |
| Revenue by till report | Prints a thermal paper report showing sales by till. |
| Revenue by user report | Brings a thermal paper report showing sales by user. |
| Reverse sale | Prompts the user to return all the items in a sale. Must enter the sale ID. |
| Sale discount | Applies a discount to all eligible items in the sale. |
| Set units | Sets the quantity of items to sell. Designed for touchscreen usage. |
| Set user | Prompts the user to enter their PIN code to record the sale against. |
| Store credit card | Prompts the user to store the credit card using Windcave online. |
| To start menu | Returns the user back to the start menu. Used by retail/cafe users. |
| Tour sales | Prints a thermal report showing sales by tour code. |
| Void | Voids an inprogress sale. |
| Voucher lookup | Look up an admission or membership to see whether it's valid. |
| Voucher scan | Scan the admission or membership card voucher to check validity. |
| X-off | The subtotal of all transactions processed through the till. |
| Z-off | The final total of all transactions processed through the till. Run at the end of the day. |
Change the button sizes & colours
You can adjust the size of your buttons so they are double-wide, double-high, or both, so they stand out on the POS screen. You can also add colours or icons to the buttons for easier visual recognition by your team. Follow these steps to set up button properties:
- In design mode, right-click the button you want to make larger and select Edit button.
- Select an option from the Size drop-down (make sure you have a free button space available to the right and/or beneath the button you are resizing):
- Extra Wide will cover the next button across on the right-hand side.
- Extra-High will cover the next button down in the column.
- Extra-wide and high covers the next button down and across.
- Select a button type from the list on the right and set the caption.
- Choose a colour or select an icon if required from the droplist.
- Press Ok to save your changes.
Button caption-text formatting
IBIS POS allows you to format display text using Hypertext Markup Language (HTML). HTML-formatted text contains markup tags, which define text appearance. Tags are enclosed with the '<' and '>' symbols, and typically have a corresponding end tag. If a tag is not matched by its ending counterpart, all text that follows the tag will be formatted accordingly.
The following tags are supported in the Button Properties > Caption field:

Description | Tag | End tag | Result |
Insert a line break | <br> | - | |
Change font size | <size=value> Examples: <size=10> | </size> | |
Bold font | <b> | </b> | |
Italic font | <i> | </i> | |
Underline font | <u> | </u> | |


Restrict buttons and functions with a password
If you have functions that require the authorisation of a supervisor, such as the No Sale function to open the till drawer, or item/sale returns, you can add a password to these buttons
- Enter design mode as detailed above (note that if you are password protecting buttons, you should ensure that only supervisors have access to the design mode password)
- Right mouse click on the button or function you wish to password protect
- Enter any password you wish in the Password box at the bottom right of the screen

- Click OK
- Repeat with any further buttons - passwords can be different for each button if necessary
- Once done, exit design mode
You will now find that the user is prompted for the password when attempting to access this function. If the password is incorrect or not entered, the button or function will not work.
Button properties - using modifiers to save time
A modifier added to a button changes the behaviour in the Point of sale screen. Modifiers are useful when you want to make selling an item more efficient (e.g. selling postcards in multiples of 10, you can set up a button modifier of *10, so every time you sell the item, it automatically multiplies the item by 10).
Add submenus to group your items
A submenu is indicated by 3 dots after the caption on the button name. When clicked, a submenu displays another button panel underneath. This is useful for grouping items together in your POS screen. To configure a submenu:
- In design mode, right-click the button you wish to make a submenu and select Edit button.
- Tick the submenu box and enter a caption. Avoid any control characters such as &, or % if possible.
- Set any other properties as desired, such as a colour or icon - note passwords do not work for submenus.
- Press OK to save your changes.
- You can now open your submenu and start adding new buttons underneath.
Edit POS buttons
You can change any details about a button you have created easily.
- In design mode, right-click the button you want to make changes to, and select Edit button.
- Make the changes required and press Ok to save.
Move buttons around
You can move buttons around the Point of sale screen by holding the CTRL key, then clicking and dragging the button with your mouse when you are in design mode.
Remove buttons
You can remove a button from the POS screen by right-clicking the button and selecting Clear when you are in design mode.
Set up keyboard shortcuts
You can easily optimise your POS screen for use with a keyboard and mouse. Allocating a key code to any system function (i.e. a unique letter which behaves the same way as clicking the button with your mouse) will make using POS very efficient on a keyboard.
- In design mode, right-click the button you want to key code and select Edit button.
- In the Properties menu, enter a unique letter in the Keycode field. (The letter must only be unique on the menu where the button appears. The same key code could be used on another button under a submenu).
- Press Ok to save your changes.

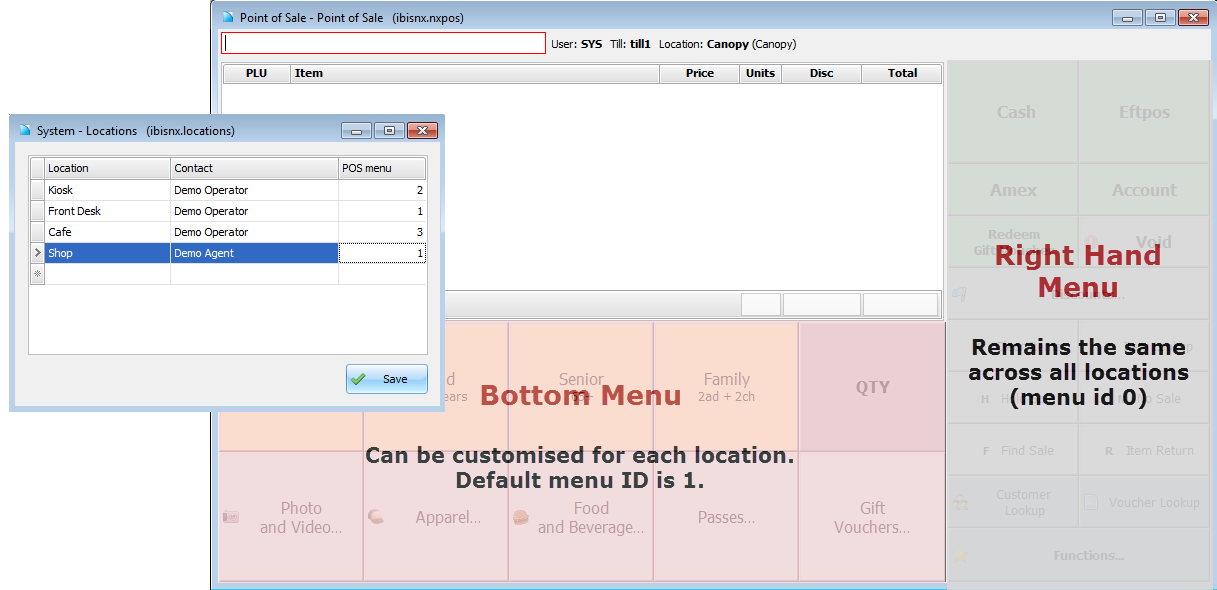
Configure unique POS menus per location
You can customise the buttons that display on the bottom POS menu per location. Please note that the number of button rows/columns must be consistent, but the display of the items can be unique. To create a unique button panel on the bottom for a location, follow these steps:
- Open the Locations screen under the System menu.
- Select the location where you require a unique button panel and enter a number (2 or higher) in the POS menu column.
- Open the POS screen and configure the blank bottom button menu as required. Ensure your till name (i.e. device) is set up in the Machine settings screen for your new location before opening the Point of sale screen.
- If you want to set up another unique menu, repeat the steps above and enter a unique number (e.g. 3) into the POS menu field.
- If you need to revert to the default menu, change the POS menu number back to 1.
- If you want to set up 2 locations with the same menu, just ensure the same POS menu number is assigned to both.
If the bottom area of the POS screen does not need any buttons to display:
- Open the System settings screen under the System menu.
- Set the Rows on the bottom panel to 0 to minimise the size of the bottom area of the screen.
NOTE: if the bottom area of the POS screen is mainly blank, e.g. there is only one row of buttons:
- Open the System settings screen under the System menu
- Set the Grid height to a value that works for the POS screen at your site to reduce the amount of blank space (maximum value is 100)
POS buttons recommended for touchscreen use
There are a number of functions that can be added to your POS menu to ensure ease of use with a touchscreen.
| Function | Description | Best Placement |
|---|---|---|
| Set units | Use this to specify the number of units for an item. | Right-hand function menu. |
| Increase units | Use this to increase the units by 1 in a sale | Right-hand function menu. |
| Decrease units | Use this to decrease the units in a sale by 1 | Right-hand function menu. |
| Delete line | Removes an item line from a sale | Right-hand function menu. |
| New sale | Starts a new sale | Right-hand function menu. |
| Set user | Prompts for a user PIN | Right-hand function menu. |
| To start menu | Returns to the main button menu from the nested submenu | Under a submenu (most useful within a cafe setting, where the default return to start setting has been disabled). |