TABLE OF CONTENTS
- Sector product overview
- Step 1: Create your sectors
- Step 2: Add your services
- Step 3: Set up pickups and dropoffs
- Step 4 (optional): Set up a super service
- Step 5: Set up price options
- Step 6: Set up price codes
- Step 7: Set up pricing
- Step 8. Add a new product
- Step 9. Build the product
- Step 10: Set up departure availability (template day)
- Troubleshooting
Sector product overview
When setting up a sector transport product, it is always best to start by drafting a plan on paper or Excel. Map out your services, stops, pricing, vehicles or vessels, etc using the following questions to determine how each of those components translate into IBIS:
What routes will I offer? E.g. Queenstown - Milford Sound. These will be your services. When working with transport, a service can be a 'sub service' (single) or 'super service' (multiple).
Which stops can people book along the route? e.g. Queenstown – Te Anau or The Divide – Queenstown. The stops are referred to as sectors.
What pickup and dropoffs are available? E.g. The Millennium Hotel or the Airport.
Will you have different prices for adults/children/students/seniors? These are your price options.
What is the price for the entire journey? This is defined in seasonal pricing.
What will you charge for part of the journey? This is your sector pricing.
What time will your services depart and how many places are available per departure? These are set up in your template day.
Understanding super services and sub-services
Before you start setting up your transport products, you should understand the difference between pickup/dropoff locations, sectors, services, and 'super' services.
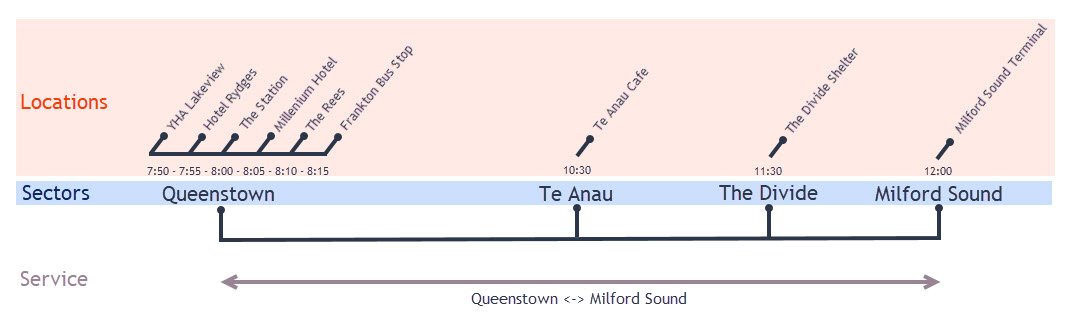
Below is a graphic of a "simple" Sector Service. E.g. You have a bus that goes from Queenstown to Milford Sound and back, and you have a few pickups and drop-off points on the way. The same goes if you operate a water taxi or ferry product; you have one vessel that sails on one route with several stops. If this is you, then you're setting up a Sector Service.
Sector Service:
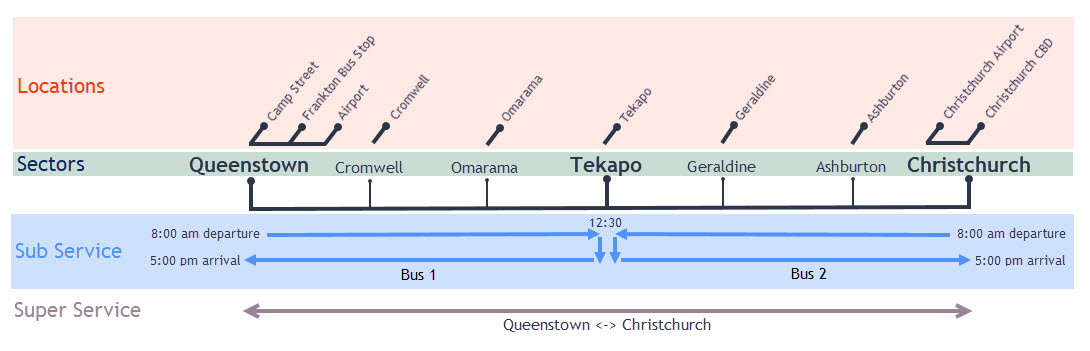
However if you have a more complex product, within which customers can transit onto different services, then you'll have to set up Sub Services and Super Services. Think of it this way; when you book a flight from London to Sydney, as far as you are concerned you are booking one route at one price. The actual service however is made up of two flights which you transit between. The graphic below portrays a bus service between Queenstown and Christchurch, but as it is using two separate buses to complete the full route, those buses have become sub-services and the full route is now a super service.
Sub and Super Services:
Step 1: Create your sectors
When setting up a sector transport product you need to define which Sectors the product will stop at. The sectors are the MAIN stops, not your pickup locations. E.g. When Queenstown is the Sector, the Bus shelter and the Airport in Queenstown are pickups. A sector can be either a pickup or dropoff point on the journey. The price of the product can change depending on the sectors selected.
- Open the Sectors screen, then click Add.
- Enter the Sector code. Try to use a meaningful code, such as an abbreviation of the sector name (maximum 10 letters, no spaces or characters. Once you have set this code you CAN NOT change it).
- Enter the Name of the sector. If a sector name begins with XX it will not be visible online.
- Notes can be used to internally communicate what the sector is or what it is for, however, they will only display on this screen.
If your system has sectors that are visited on the way out AND on the way back (i.e. return journeys), give them a unique sector code. e.g. ToreaNorth and ToreaSouth. This is because you can not have the same sector as a default pickup more than once against a product.
Step 2: Add your services
Whether you're setting up a regular service or a sub/super service, the process is the same.
- Open the Services screen, then click Add.
- Fill in the Service code (10 letters or less, no spaces or apostrophes). E.g. "QTNMIL".
- Enter the Description of the service. E.g. "Queenstown - Milford Sound".
- Set the Duration of the service. E.g. "4h 00m".
- Tick the Has sectors box.
- Click Save and close the screen.

Step 3: Set up pickups and dropoffs
Within a sector, you may have various places where you can pick up or drop off customers. The times are based on a 'time offset' from when the service (bus) departs.
Using the below picture as an example, if the service departed at 06:00 the pickup time for 'Cromwell Information Center - Cromwell' will be 06:00 as it's 0 minutes after the service departs. The pickup and drop off for 'Information Center - Queenstown' will be 07:30 which is 1 hour 30 minutes after the service leaves.
- Open the Pickup location screen.
- Select the service from the drop-down Service list at the top and click Refresh.
- Enter in the time offset. This is a time duration based on when the service is set to depart.
--> e.g. If your service departs at 0800 and you want to offer a pickup at 07:50 the time would be "(10m)". This defines the pickup as 10 minutes before the service is due to depart. Ergo, if you want to pick up at 08:10 the 'time' would be "10m" as this defines it as 10 minutes AFTER the service departs. - In the Location column, you can either free type in the location or select it from the drop-down list. Once you have entered in a location name and saved it against one record it will always show as an option in this drop-down list.
- In the Sector column, select the sector the pickup point is located in
- Set the online policy.
- Select only ONE location per sector as default by ticking the box in the Default column for that sector. This will make the location shown as the default option when making bookings (if this is not the one they want they can then select from the drop-down list).
- Determine if the location is going to be a pickup or drop-off option or both by ticking the Pickup and/or Dropoff boxes.
- Enter in the additional cost of selecting this pickup or dropoff in the Cost column if there is one.
Note that this additional cost is a flat rate and not used to set your sector pricing.
Step 4 (optional): Set up a super service
A super service is created in the Services screen, exactly as described in Step 2. Before you set up your super service sectors, ensure you have created your sub-services with their pickup/dropoff sectors.
When creating your super service,
- Open the Pickup locations screen and select your Super service from the list.
- Use the copy function to add the pickup/drop-offs for the first sub-service.
- You will get a popup asking if you want to Sequence the pickup times you are copying. You can say no to this prompt for the first sub-service added. For subsequent sub-services, you will say yes.
Sequence the pickup times adds the time offset of the last pickup/dropoff location in the list to the next set of copied pickup/dropoff sectors. If there is a delay before the next sub service starts, add a temporary pickup with the Time offset being the duration between the departure time of first sub service and the one you want to copy. E.g. if the first sub service departs at 9am and the one you want to copy starts at 1:30pm, create a temporary pickup with the tome offset of 4h 30m. You can delete this after you have copied your new pickups across.
Step 5: Set up price options
Price options are the rates your customers, staff or agents select when they book your transport products. Price options are common to all products within your system, so you don't have to set up new ones each time. If your price options are going to be used for sector products, however, ensure the Sector OK box is ticked to allow for sector pricing.
- Open the Price Options screen, then click Add.
- Fill in the Option code (10 letters or less, no spaces or apostrophes and once you have created this code, you MUST NOT CHANGE IT).
- Fill in the Option name which will appear on the booking and your FIT website if you have one. Do NOT use brackets () in option names if they will be used ONLINE. The max character limit is also 35 characters for display online.
- Enter the type of option - this is used for reporting on the Booking Option Analysis Report.
- Person - This grouping is usually associated with passengers (e.g. Adult, Child, Student).
- Addon - This grouping is usually associated with lunches, or photos and videos.
- Discount - This option type will trigger a % discount calculation by the value specified in the option name (e.g. 20% discount). For more advanced discount configurations, see the new promotion features.
- Select the list order for this option to determine how the options should be prioritised in the Booking screen, or online.
- Set the number of places this option will decrement your availability. E.g. a 'Family' option might take 4 spaces, whereby an 'Adult' option would typically take 1 place.
- Set the Edit policy to either No edit OR Internal only. If Internal only, users can amend the price in the Booking screen.
- If you wish to sell your product online, you must specify the online policy for the price options you wish to show to agents or customers booking via your website.
- To prevent discounts and/or commissions from being applied to any price options, untick the Disc OK and Comm OK boxes for the option.
- Tick the Sector OK box to allow for sector pricing.
- Save your changes.

Step 6: Set up price codes
A Price code allows you to allocate pricing to each service. So To set up a new price code:
- Open the Price code screen
- Add a new row by clicking the
 button at the top of the grid.
 - Fill in the Price code (10 letters or less, no spaces or apostrophes. You cannot change this code once it is set up).
- Fill in the Description of the price code and select whether it can be Discounted or is liable for Commission by ticking the boxes.
- Set the online policy to Internal only. If the policy is set to inactive, the price code will be hidden by default.
- Click Save and close the screen.

Step 7: Set up pricing
There are two parts to setting up the sector fares. The first step is to input your total journey cost for the service (Queenstown -> Wanaka for example) into the Seasonal Pricing screen against the service. The second is to update the sector pricing against that service in IBIS Online.
- Setup/change full fare
- Open the Seasonal Pricing screen and choose the Season starting date.
- Find the price code that you want to change the full fare for.
- Change the Adult and Child fare, then press Save.
- Setup/change sector fare
Sector pricing is calculated automatically based on a percentage of the total journey cost. E.g. a bus from Queenstown to Wanaka is $60 (100%), the sector Queenstown to Frankton is $15 (25%), Queenstown to Cardrona is $35 (58.33%) and Frankton to Wanaka is $40 (66.66%). If you would rather specify your own sector pricing, you can do this in the Sector pricing screen.- Select the service you wish to change the fare for and tick 'Show price' - the base price will default to display $50
- Enter the amount of your full fare in the 'Base Price' field, then click Refresh - in the above scenario you would enter your full fare as $60.
- Locate your From sector in the column on the left, and your To sector in the row at the top, and enter your price for this sector in the intersecting box - in the above example you would locate Queenstown on the left column, then Frankton in the top row, and enter $15 in the intersecting box. Repeat for each sector until all boxes are filled with the correct price
- Note that in the background the system will work out and store the percentage of the full fare
- Save your changes.
Once you add the sector fares, IBIS calculates the sectors as a percentage of the full fare. New Season price increases are simple. Increase your FULL fare by 10% and all corresponding sector fares increase automatically.It is assumed that child pricing has the same pricing percentage as an adult. IBIS will calculate the child fare as a percentage of the adult sector you have entered. This is based on the FULL fare you enter into seasonal pricing for the child price. E.G If the full fare for an Adult is $50, and the full fare for child is $25, ibis will calculate all child sector fares as 50% of the Adult sector fare. You cannot override this.
Step 8. Add a new product
The final step is to create a "product" for your customers to book. Follow these steps:
- Open the Operator products screen, then click Add.
- Enter a product code (max 10 alphanumeric characters, no spaces. Once you have created this code, YOU CAN NOT CHANGE IT).
- Enter the product name, this is how it will display to staff or customers booking the product online. The system default is 50 characters, however, we can extend this to 100 characters if required.
- Select your company contact from the Operator droplist (this should match the name showing in the Operator droplist at the top of the screen unless you are setting up new products for a business operating in a different location).
- In the account column select your agent/direct account as specified in your System settings screen.
- Set the type of product to Transport.
- Set the online policy to internal only until you have finished all of the product configuration steps in this article.
- Save your changes.

Step 9. Build the product
Building a product ties together the product, price code and service. Each row in the Build Products screen is a product component. A simple product will have a single component, but a more complex product will have multiple components. Generally, you will have a product component for each service in your product.
- From the Product List screen, click the row indicator cell > to the left of the product name to open the Build Products screen. If you see a + symbol in the row indicator cell, refresh the screen.
- Ensure the Operator and product names are populated at the top of the screen. If not, close the screen, and repeat step 1.
- Add a new row by clicking the + button at the top of the grid.

- Fill in the Code field (10 letters or less, no spaces or apostrophes). Each component code must be unique and once a code is specified, you cannot change it.
- Fill in the Name of the product component. Make this name meaningful as it will appear on the Booking screen for your frontline staff to see.
- Tick the Primary tick box as you will only have one component.
- Tick the Required tick box.
- Select the appropriate Service code and Price code from the drop-down lists.
- Save your changes.
- Click the Details tab.
- Enter a caption in the Pickup or Dropoff field (e.g. 'Pickup' or 'Meet at'. Captions ending with a * will allow the pickup location to be edited by the user from within the Booking screen).

Step 10: Set up departure availability (template day)
IBIS uses templates to allow you to maintain a default operating schedule for all of your services, along with their online policies and the max places associated with each. See the related article for more information on managing templates.
- Open the Setup template day screen.
- From the Day type droplist, select the appropriate template(s) you wish to update with your new departures. If this is not obvious to you, you may wish to check with other users or contact IBIS for assistance.
- Add a new row by clicking on the + button at the top of the grid.
- Enter the service start time in the Start Time column of your new row, then select your new service from the droplist column.
- In the Places column, specify the maximum number of places available on the service.
- If there is a minimum number of bookings to confirm the product departure, enter it in the Confirm column. Frontline users will see the confirmed tick in the Availablity screen when trips have reached the minimum capacity.
- Set the online policy for the service if you want the departure to be available on your website or to agents using IBIS (see the online policy article for more information)
- Repeat for each service or departure time and note that you can make use of the grid functions for bulk actions.
- Save your changes.

Once your departures are configured on your template, you will need to apply your template to your Service Calendar. If you have already applied a template to your calendar, IBIS will not duplicate or change any existing departures, it will only add NEW departures which did not exist previously. See the related article on timetable management for more info.
We strongly recommend you only apply your template for a single day and then carefully check your new product configuration before applying templates across an extensive date range
- Open the Service Calendar from the Products and Services menu.
- Choose the Start month and click Refresh
- Click and drag your mouse horizontally and vertically to highlight all days you wish to apply a specific template to.
- Right-click on the highlighted section and select Apply template day, then choose your template from the popup. When prompted 'do you want to Build the day' you can say no. We have deprecated this functionality.
- Depending on the date range and number of departures, the system may take a minute or two to update all the departures.
- When it is finished, the highlighted row will display vertically.
- Save your changes.
- Your departures will now display in the Specific Availability screen so you can make any additional amendments from here.

Create a supersector template day
- Add the sub-services to the template day by following the steps above. The start time of the sub-service is the start time of the bus/driver's trip.
- In the Group column, type "Sub Service" or any other name you want to use to group together your products in your Template Day screen.
- Add in the supersector service with the start time as the start of the whole trip and enter 'Super Service' into the Group field
Your Super service is made up of 2 or more existing Sub services, so you need to reference these in the Sub services column using a comma-separated list of the fields <subservicecode>@<HH:MM> where H:MM is the start time you just set. E.g. a valid entry would be "invmoss@10:30, mosstea@12:15, teamil@13:15"
Another example:
Below we have the supersector Queenstown to Dunedin (zqndnd) which consists of Queenstown to Cromwell (ZQNCRM) leaving at 09:15 and Cromwell to Dunedin (CROMDND) leaving Cromwell at 10:20. The sub-sectors transit in Cromwell. The supersector has been grouped into the category 'Super Sector' so it is easily identifiable. The sub-services have been grouped into separate buses.
Troubleshooting
- When you set up the Product in the Product List screen, the Type needs to be set transport
- You can only have one default location for each sector
- If you are setting up pickups and dropoffs for a SuperService sector transport product, the pickups and dropoffs must all feature under both the sub-service and the super service. Travel time for a sub-service may differ from a super service as the departure times vary from the super service
- Sectors can not be repeated in a journey -if you pass through one sector twice you will need to add it as a new sector with a different name i.e. Queenstown return
- In the Define Locations screen, the Time is a time offset from the service start time and defines the pickup and drop-off time.
- In the Customer Tour screen, sector products will NOT SHOW if they are set to Internal Only
- If your Superservice products are not appearing, check the syntax in the template day and the Specific Availability screen for your super services. For example;
'teamoss@9:15:mossinv@11:00' will not work because there is a colon in between the sub-services.
'teamoss@9:15am,mossinv@11:00am' will not work because there is an 'am' after the sub-service times.
'teamoss@9.15am,mossinv@11.00am' will not work because there is a '.' rather than a ':' in the sub-service times.
'teamoss@9:15,mossinv@11:00' has the correct syntax and will work as long as the sub-services exist and are set up correctly