
TABLE OF CONTENTS
Revenue codes for items
Items include retail, admission, events, membership and gift vouchers.
- Open the respective items screen (Retail, Gift voucher, Admission, Membership, or Events).
- Right-click the column header, then select the column chooser.
- Drag and drop the GL code field into the grid.
- Type directly into the GL code field in the grid to add it to your item or use the autofill tool to save time.
- Fill out the GL code for all items you will sell through Point of sale. Remember to keep this updated as you add new items.
- Save your changes.
Tracking Codes
- Open the respective items screen.
- Right-click the column header, then select the column chooser.
- Drag and drop the Tracking Code 1 and /or Tracking Code 2 field into the grid.
- Type directly into the GL code field in the grid to add it to your item or use the autofill tool to save time.
- Fill out the Tracking Codes for all items you will sell through Point of sale. Remember to keep this updated as you add new items.
- Save your changes.
Revenue codes for reservation products
IBIS can set Revenue codes for a reservation product in the Build product screen. Each component can be assigned to a different GL code, or each component can be split across multiple GL codes. Splitting the revenue across multiple codes allows you to allocate revenue to multiple cost centres in your accounts system. The commission is also split following the same rules, allowing you to assign commission as an expense to each cost centre.
The format for the revenue splits is GL code followed by the percent of the split in the following format: [GL code]:[percentage] or 4/1025/250:100
If you are splitting the revenue across more than one GL code, then comma separate these in the list in the following format: [GL code]:[percentage],[GL code]:[percentage] etc. E.g. 4-1234:25, 5-4565:75.
The percentages must add up to 100 for it to calculate properly. GL codes can be defined in any text format.
Please note the fixed dollar revenue allocation will only specify the revenue at the fixed price regardless of how many units are in the sale.
If your GL coding also includes tracking codes, divisions or departments for your reservation products these can also be added to the revenue split in the Build Product screen. The available options are:
GL code|Tracking code 1|Tracking code 2:Percent = 1290|Milford|Crusise:100
GL code|Tracking code 1:Percent
GL code||Tracking code 2:Percent
Tracking codes can be added when you are splitting revenue across more than one GL code, please use the following format:
GL Code|Tracking code 1|Tracking code 2:percent, GL Code|Tracking code 1|Tracking code 2:percent = 1290|Milford|Food:60, 1290|Milford|Beverage:40
Please ensure you use the pipe character | rather than a lower-case l.
Please note this format is only available if you are using the Ibis finance standard model.
Examples:
In this example, the revenue split for all three components is set to 100 percent for each component to the appropriate GL Code:
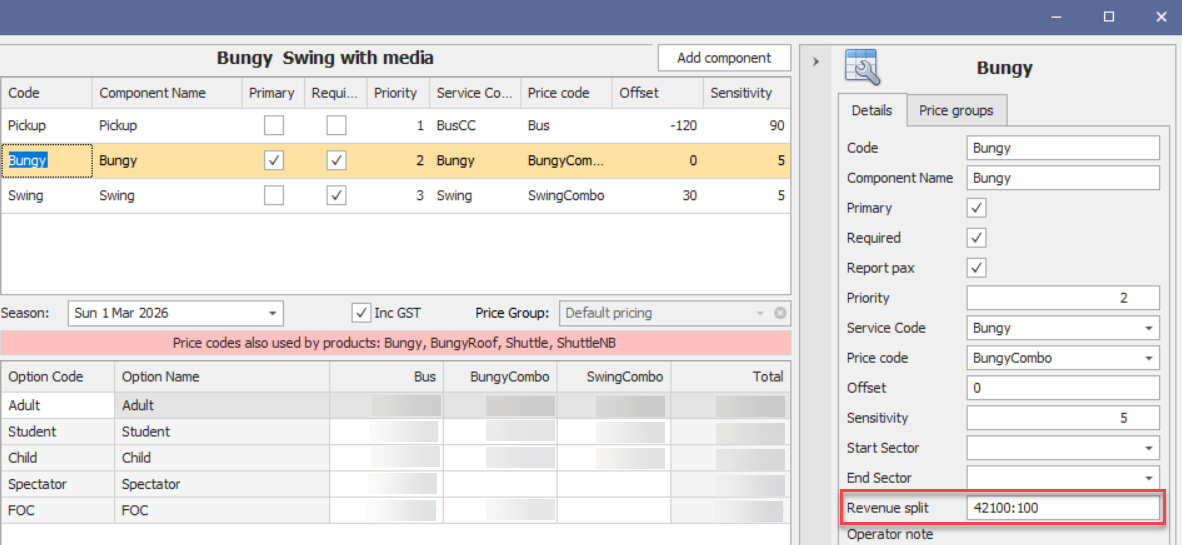
In this example, the revenue split for the primary components is a percentage split across 2 revenue code. The rest of the revenue is allocated as 100% to each of the specific revenue codes. This type of setup could be used for a packaged product where the sale value all sits on the main component. Still, if any extras are added to subsequent components e.g. a lunch upgrade, then all of the revenue would be allocated to the specific GL code.
You can add the revenue split column into the component grid to make it easier to see all revenue across a product in one view. See how to add columns in Working with IBIS grid screens.
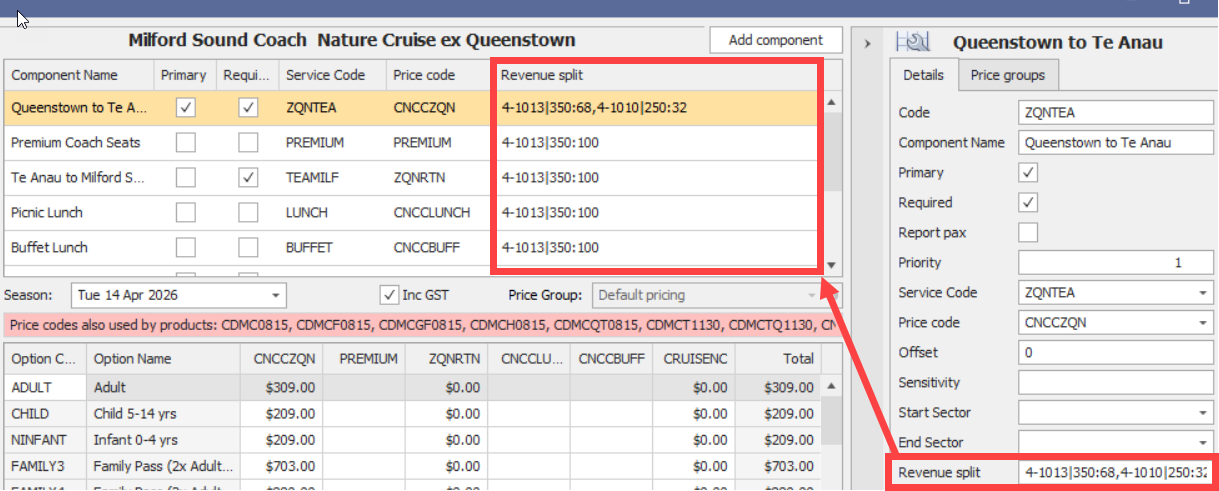
In this example, the revenue split also contains tracking codes and is 100 percent for the component. This will be split into the corresponding columns for your finance systems export:

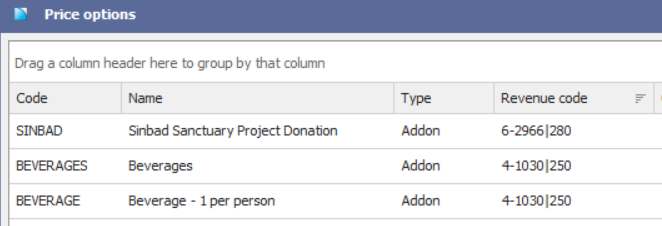
There is also the function to set the revenue split against a Price Option which overrides Revenue split defined against the product component. An example of this would be for Charter products where there is only one service (the charter) for the revenue split but the options that can be selected in the booking need to go to a different GL code.
You can configure your master GL (General ledger) and tracking codes in the Finance export codes screen (this is for finance integration with Netsuite or BC only).
If 'GL override' is selected, the GL Code or Tracking codes held within this screen override the revenue codes already set up against reservation products and retail items in the system.
The GL and Tracking codes defined in this screen will determine the account that the revenue is reported against, depending on the type of transaction in the ledger. Please look at the Trial balance reconciliation for more information on the types of transactions.
If you export your financial data from Ibis, this screen is used to set up your export GL codes for holding accounts e.g. Debtors clearing and income in advance. You must ensure that Tracking codes and Tax descriptions are entered here exactly as they are recorded in your accounting system to ensure a smooth transfer.

Business Central Integration export code set up
For Business Central integrations, you must ensure that the tax line's description matches the associated parent line's description and that the relevant revenue codes, e.g., booking sale and booking tax, are applied to both lines.
