
IBIS makes it easy to manage your departure timetable, whether it's setting up a whole departure schedule in bulk or making ad-hoc scheduling changes. It is very quick to set up your departure schedule months or years in advance. Once a schedule is set up, you can make adjustments to your timetable as needed following the processes outlined in this article.
Watch a 6-minute video on Availability management in IBIS:
TABLE OF CONTENTS
- Setup a service template
- Setup a standard departure template
- Apply departures to your service calendar
- Re-apply departure templates to your Service calendar
- Add a departure for a specific day
- Delete all empty services
- Delete selected services
- Clearing departures from the service calendar
- Change the departure time of an existing service
- Viewing the bookings attached to services
- How to block a service
- Change details of existing departures
- Adding a day note
- Viewing change history
Setup a day type
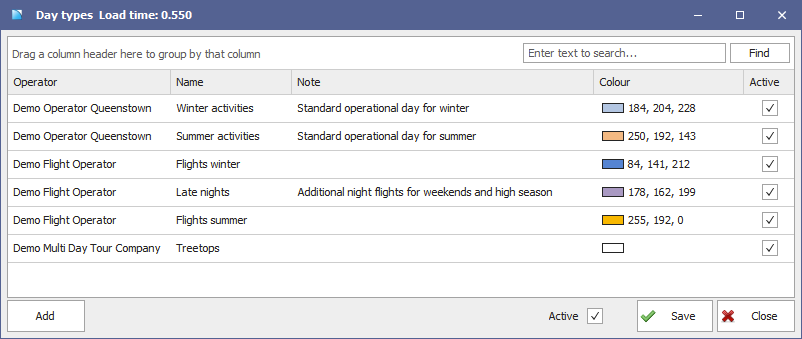
IBIS uses templates that allow you to define your standard operational schedule so you can update your timetable in bulk. A day type is where you define the names and colours used for those templates. The best way to configure your templates is to define your different seasons or operational day types. E.g. the most common day types are either seasonal - i.e. Summer, Winter, Shoulder OR relate to specific day types - i.e. Weekends, Midweek, Public holidays. To create your day types, follow these steps:
- Open the Day types screen (this can be opened from the menu under Departure setup, or from the Service availability screen under the Functions menu).
- Click the Add button to add a new day type.
- Select the Operator this day type applies to.
- Enter in a Name for the day type (this is the template name that you will select when configuring your calendar).
- Optionally, type in a meaningful Note to help others identify exactly which day type this refers to.
- Click Save.
- Select a colour to represent the day type on your Service calendar.
- Save your changes by clicking Save.
Setup a standard departure template
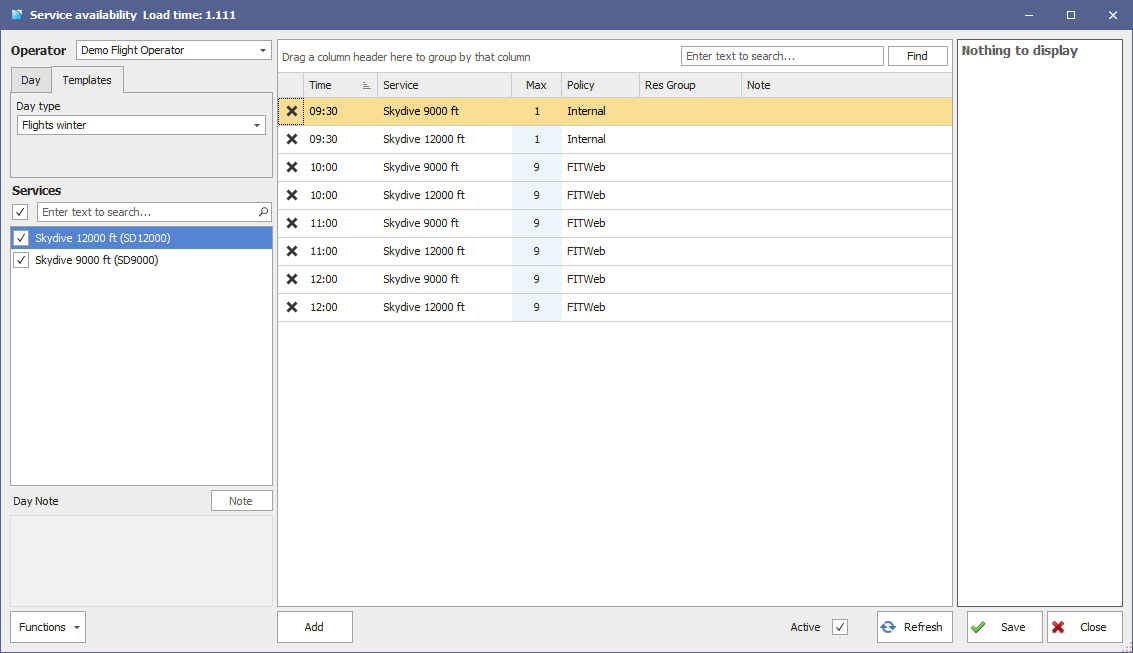
Once your template day types are set up, you can then define your standard operating schedule for each template. Each template would consist of all of your service's default departure times, along with their online policies and the max places associated with each departure. To set up a new template day follow these steps:
- Open the Service availability screen.
- Select your Operator from the drop down menu and click on the Templates tab.
- Select the appropriate Day type from the drop down menu.
- To add a service, click the Add button and fill the details
- Enter the service Start time, then select the Service from the drop list.
- In the Policy field, set the online policy of the service accordingly.
- In the Max places field, specify the maximum number of places available on the service.
- Click Save to add the departure to the template.
- Repeat for each service and note that you can make use of the grid functions for bulk actions.
- The Res group field can be used if you have a lot of services and want to group these when viewing departures in the Day tab of the Service availability screen.
- If you make any changes in the grid, make sure you click Save.
Once you have a template day set up, you can use the copy template function to make setting up new templates faster.
Apply departures to your service calendar
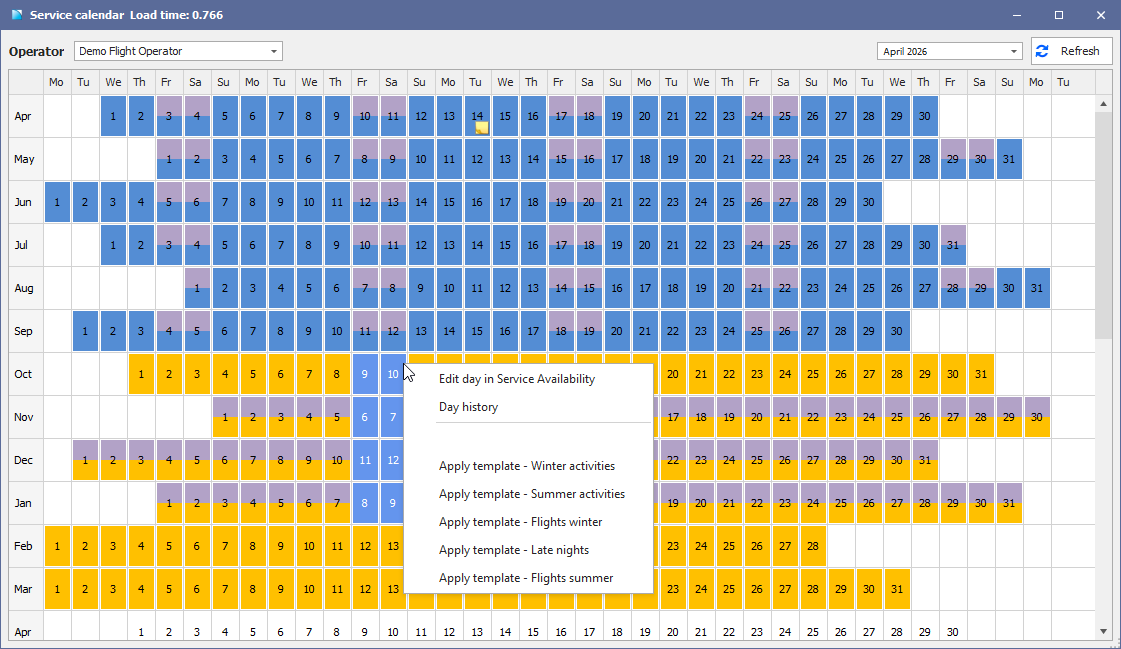
The service calendar is where you can update your departure template in bulk over several months or years. When you apply your template to the Service calendar, all of the departures on your template can be managed in the Service availability screen. The number of services you are applying in a template and the date range you are applying it for can mean it takes several minutes to apply a template change. We don't recommend you apply large templates (containing 20+ departures) in stretches longer than 4-6 months. To apply your templates:
- Open the Service calendar screen.
- Select your operator from the top drop-down menu.
- Click and drag your mouse horizontally and vertically to highlight all days you wish to apply a specific template to.
Use CRTL+ Click to multi select non-sequential date ranges. E.g. If you want to select all weekends or all weekdays across the year.
- Right-click on the highlighted section, then select the day type you'd like to apply.
- Depending on the date range and number of departures, the system may take a minute or two to update all the departures.
- When it is finished, the cells will have changed to the template colour.
- Your departures will now display in the Service availability screen so you can make any additional amendments from here (you can right-click on a specific date to open up that date in the Service availability screen).
Re-apply departure templates to your Service calendar
If you want to add new services to your departure timetable, you will often find yourself in a situation where you need to re-apply templates to the Service calendar. You can apply templates on top of existing templates, but note that an additional colour is only applied when additional services are added.
Here are some best practice tips showing how we would recommend you manage these types of changes:
If you need to add new services to an existing template then reapply this template to your Service calendar, only the NEW departures will be added to the Service availability screen. It won't double up on existing departures, so this is normally the simplest way to add new services to the system in bulk.
If you edit any existing services on a template (i.e. max places, online policy, etc) and re-apply this template to your Service calendar, this will not change any existing departures. These changes will need to be made in Service availability.
If you have deleted a lot of services from your Service availability screen and do not want to reapply the old template, you can create a new template day called "Adhoc" or "Fixups" which you can use to only add specific services. Remember if you add new stuff in an ad-hoc manner, it is a good rule of thumb to keep your default 'standard' templates up to date with any changes so they are ready to go when you next reapply them.
There is no limit to how many 'service templates' you can set up, but if you create new ones every year (e.g. Summer 2027, Winter 2028 etc), then you will find that the list of templates gets ridiculously long. You can edit and reuse old templates if you need to. Just right-click on the row and click 'Delete row' to remove any unnecessary templates and re-save your changes.
Add a departure for a specific day
If you need to add a departure to a specific day, you do not need to apply a new template. You can simply add a new departure in the Service availability screen, follow these steps:
- Open the Service availability screen.
- Select your Operator if required.
- Select the Start date that you want to add the departure for
- Click the Add button
- Enter the service Start time, then select the Service from the drop list.
- In the Policy field, set the online policy of the service accordingly.
- In the Max places field, specify the maximum number of places available on the service.
- Click Save to add the departure.
- Check that departure appears as you would expect in the Departures or Availability screens.
Delete all empty services
If there are no bookings on a service, you can delete all empty services.
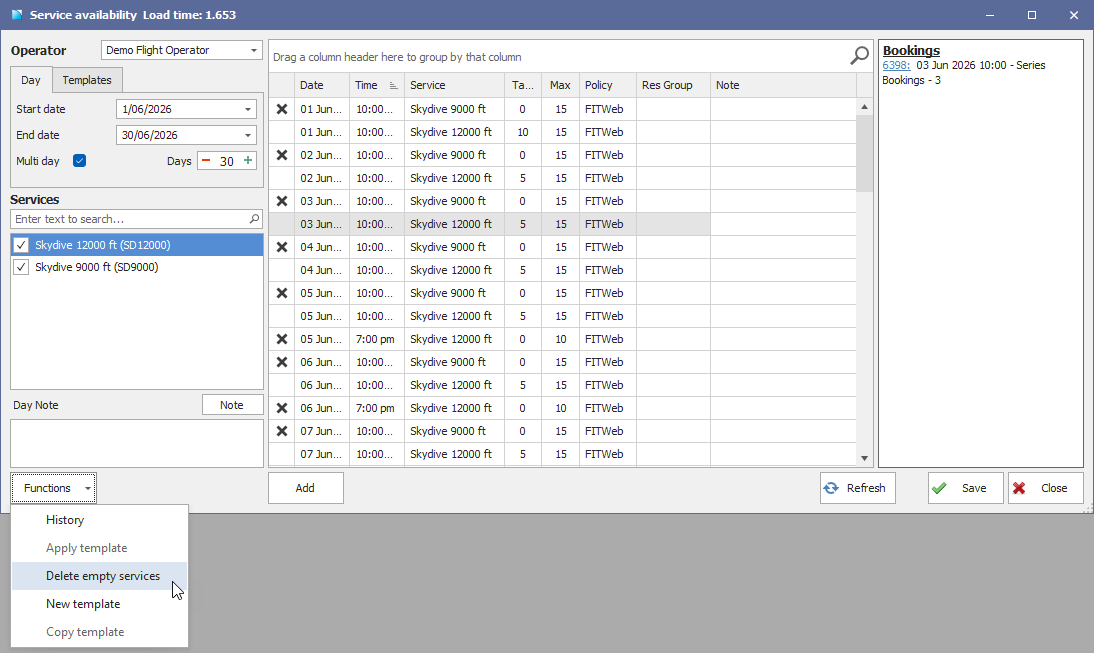
- Open the Service availability screen.
- Select your Operator if required.
- Select the date to edit in the Start date. To view multiple days, tick Multi-day then enter an End date or enter the number of Days and click on the Refresh button to display the results.
- Only leave the services ticked which you want to delete.
- When you have all the services showing you would like to delete, click the Functions button, then Delete all empty services.
- Any services which had cancelled bookings against them will be set to inactive automatically.
- Any services which remain due to active bookings being attached can have the policy set to inactive.
- Bookings must be rescheduled to active departure times if you set the service to inactive.
- Save your changes.
Delete selected services
If you only want to delete a specific service time, and there are no bookings on a service, you can delete selected services by clicking the X on the row, then clicking Save to commit your changes.
Note:
- If there are active bookings on the service, the X is not visible.
- If a service has cancelled bookings against it, they will be set to inactive.
Clearing departures from the service calendar
When you apply a template day to the Service calendar, it automatically adds all of the services to the Service availability screen. This also works the other way around: when you delete ALL of the services belonging to a template from a day or multiple days in Service availability, it will automatically remove the colouring from the Service calendar.
Change the departure time of an existing service
If you need to make a change to the time of an existing departure and there are NO bookings on it, you will need to delete the service and add a new one.
If you need to change the time of an existing departure WITH EXISTING BOOKINGS on it:
- If you have a single-component product, follow the steps using IBIS Online.
- If you have a multi-component product (i.e. there is more than one service used to operate this product), you cannot change the existing service time. Change the policy of the existing service to inactive, then add the new service and reschedule the existing bookings.
Ensure you contact customers to advise them of any schedule changes.
Viewing the bookings attached to services
If you need to make changes to your departure timetable but there are already bookings made on those services, you may need to cancel or reschedule existing bookings.
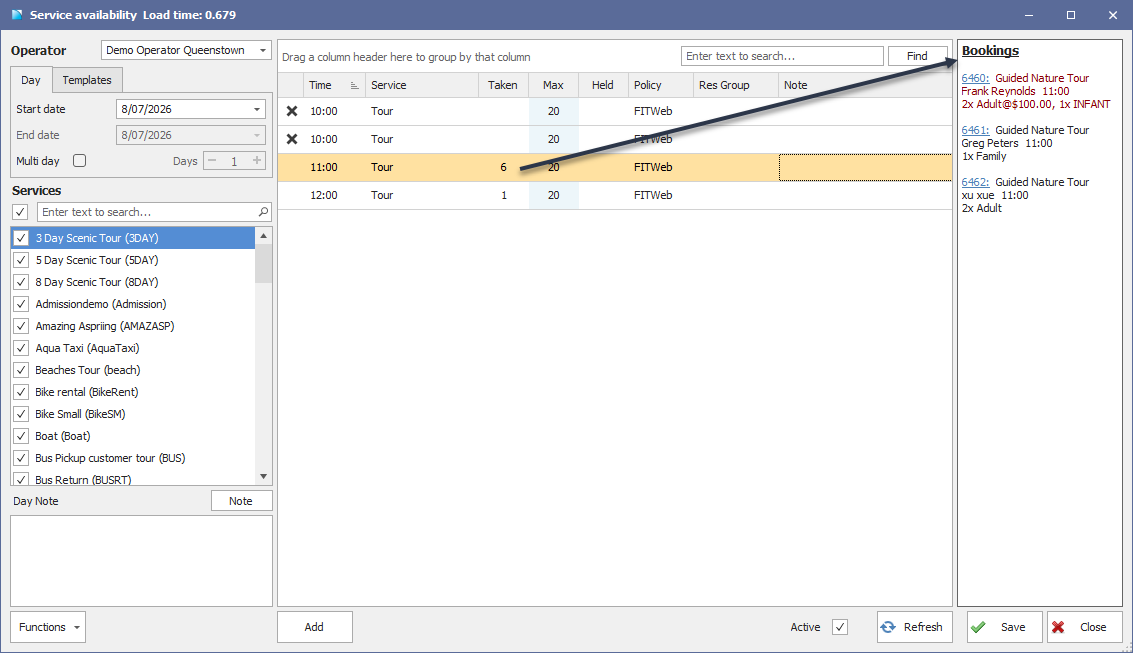
It's easy to see which bookings are associated with an individual departure by clicking on the service row in the grid. On the right-hand side, you'll see the bookings associated to that service with a clickable link which opens the booking in the Itinerary screen. If there's a cancelled booking on that service, it'll be displayed in red.
If you are modifying a lot of records, it is easiest to run the Option analysis report in IBIS Online in List view, then filter for the selected service/time/date range as necessary.
How to block a service
A service can be temporarily blocked from your Departures by using one or more of the following methods:
- Deleting the service
- Changing the departure policy to inactive
- Setting the max places 0 - this will show the departure as Full to anyone viewing the product online
Change details of existing departures
If you have already applied a template to your service calendar and now wish to make changes details such as Max places, Policy, Res group or Note on existing departures, you can do it directly in the Service availability screen. Alternatively, if you want to do this in bulk, you can modify the details of the service on the Service template, then re-apply to the Service calendar.
How to do this in Service availability (even in bulk by extending the date range), using the example of Max places:
- Open Service availability, select your operator and select the date (range) you want to adjust max places for, then click on Refresh.
- You can filter for the specific service on the left-hand side, or use the search bar in the grid to narrow down your results. Note: if you search for a specific time, you're best to put the time between apostrophes. E.g. when searching 10:00, enter '10:00'.
- Change the first number in the list, then select all relevant rows by clicking each individually holding down the ctrl key, or holding the shift key to select in bulk
- Right-click on the value you already updated, then select fill column to update all highlighted rows to that specific column highlighted.
- Save your changes.
Adding a day note
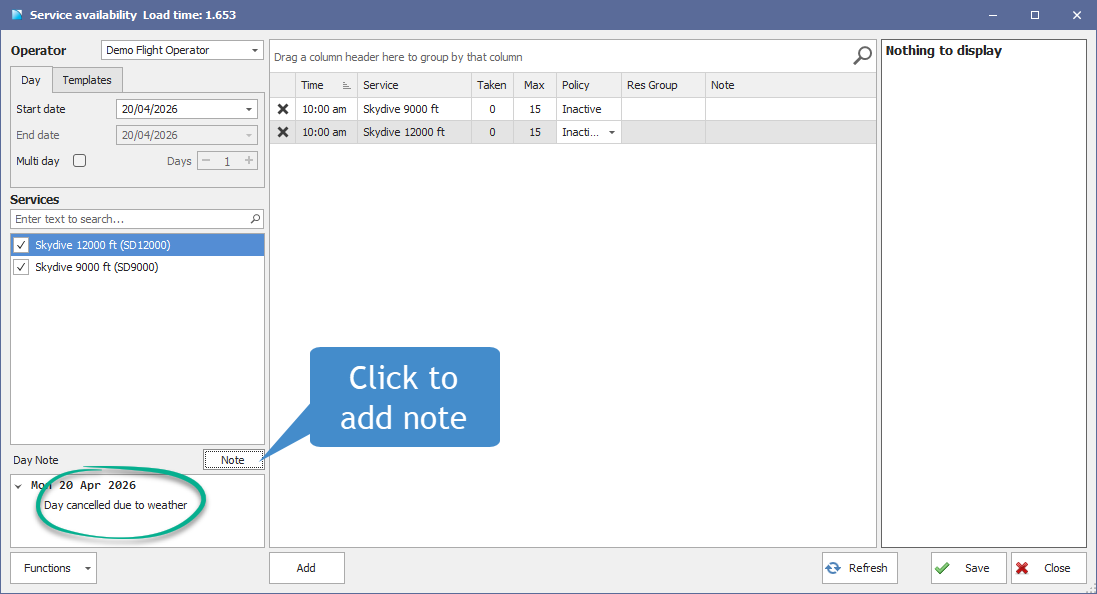
When making changes, you or your staff might want to make a Day Note about what changed and why. These notes are also visible in the Itinerary screen, and notes made there are visible here. This keeps everyone in the loop of what is happening.
- Add a note by clicking on the Note button.
- Change the date it's for if necessary (it defaults to today's date)
- Enter in your note and Save.
Double click on a note to edit it.
Viewing change history
To troubleshoot or hold staff accountable, you can view which changes were made when and by whom. You can see this in the Service availability screen by clicking on Functions, then select History. Note: it only shows changes made on the Start date you have selected, not for a date-range.
In the Service calendar, you can also right-click on a day to view this same history.
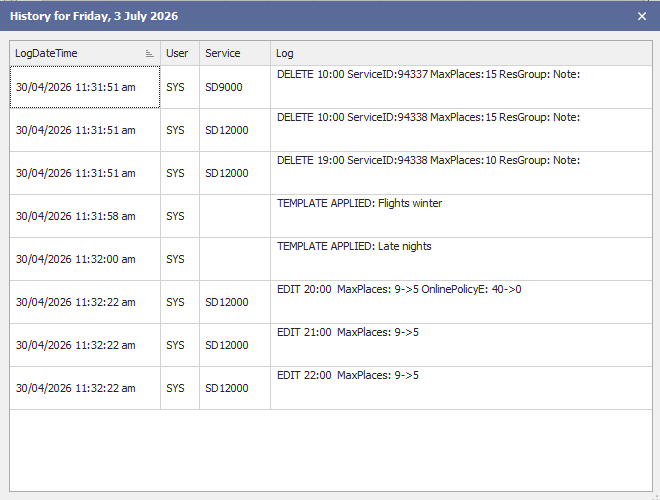
OnlinePolicyE translation:
0 = Inactive
10 = Internal
20 = Agent Trusted
30 = Agent General
40 = FITweb
We also have a report on the history in IBIS Online under System > Logs > Service Availability Log. This can be run by:
- Log date (when the change happened)
- Service availability date (service departure)
For example, if you want to find out what happened to a departure on a specific date, you can run the report as follows and filter the Service DateTime for the departure time:
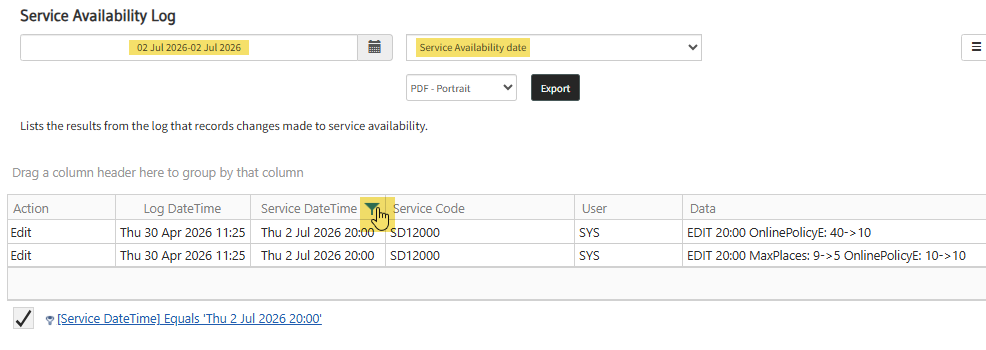
When you see a Service date time in 1900, it means a change was made to a template:
